Hey everyone, if you’ve ever worked on commercial electrical or data installs, you know a perforated cable tray is non-negotiable for keeping wires organized, ventilated, and code-compliant. As someone who’s supplied cable trays for over 10 years (no stuffy corporate title here—just the guy who drops off trays at job sites and helps folks problem-solve), I get that installing one can feel tricky if you’re new. That’s why I’m breaking this down step by step, with tips I’ve picked up from working side-by-side with electricians, general contractors, and even a few DIYers who bit off a bigger project than they planned. Let’s jump in. Cable Tray
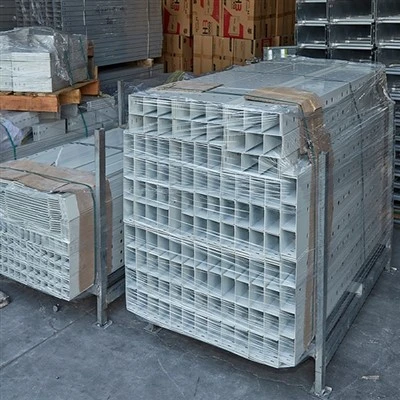
First, let’s talk about what a perforated cable tray actually is, because if you’re here, you might be grabbing them from my supplier’s line, but it’s good context. Unlike solid cable trays, perforated ones have those little holes all along the bottom and sides—game changer for heat dissipation, right? Wires don’t get trapped in stagnant air, so overheating and voltage drop are way less likely. Also, water and debris fall through the holes instead of pooling on the tray, which is huge for basements, parking garages, or outdoor runs. They’re lightweight too, so cutting and moving them is easier than solid metal, no super heavy lifting. But before you even pick up a tape measure, there are a few pre-install checks most folks skip, and that’s where mistakes start.
Prep is 80% of the battle, I swear. First, don’t just measure the length you think you need—map your entire cable run. Stand in the space where you’ll be working and walk the path: note any corners, beams, pipes, or equipment that’s in the way. A lot of new guys cut a tray 10 feet too short, and then they’re scrambling to find a compatible splice that same day. Next, confirm your load capacity. Perforated trays come in different gauges (thinner vs thicker metal) and load ratings—if you’re running a bunch of high-voltage power cables, a flimsy thin-gauge tray will bend over time, which can damage wires and create a hazard. If you’re grabbing trays from us, just tell us what you’re hanging (like 20 CAT6 cables or 4 x 12 AWG power lines) and we’ll point you to the right rating—no need to overthink it, but do double-check. Also, check your local electrical code—some areas have specific rules about tray height from the floor or ceiling, and how far apart supports need to be. I’ve had a job where a contractor saved $20 on extra supports, and the city inspector made them tear half the tray down, so that’s a waste.
Now, gathering your tools. You don’t need a fancy workshop, but skip the half-assed stuff. Here’s the quick list: tape measure, level (a 4-foot level works fine for straight runs), cordless drill with metal bits (1/8 inch for pilot holes, 3/8 inch for mounting screws), tin snips or a chop saw with a metal blade (don’t use a wood saw—you’ll ruin the tray and break the blade), utility knife (for cutting any packaging straps, obviously), socket set (for the support brackets), and a stud finder if you’re mounting to a concrete or wood ceiling. Oh, and safety glasses—those perforated edges can be sharp if you’re cutting, so don’t skip that.
Let’s start with the mounting brackets. Supports (that’s the brackets that hold the tray up) are key—they’re what keep the tray from sagging. How far apart should they be? For most standard perforated trays, every 4 to 6 feet is the rule, but if it’s a longer run or heavy load, go every 4 feet. First, mark the positions for the brackets. Use your level to draw a straight line along the path you mapped—no wobbly lines, because a wobbly tray means wobbly wires. If you’re mounting to a ceiling, find your studs or concrete anchors (use masonry anchors for concrete, wood screws for wood). If it’s a wall, same thing—studs or appropriate wall anchors. For each bracket, pre-drill a pilot hole first—drilling into metal without a pilot hole will make the bit skid, which is annoying and can scratch the tray. Secure the brackets tightly, but don’t over-tighten the screws—you don’t want to bend the bracket, which will mess up the tray’s fit.
Next, cutting the perforated tray to length. This is where a lot of new folks mess up: measure twice, cut once. I’ve seen guys cut a tray too short, then have to patch it with a messy splice that becomes a weak point. Place the tray on a flat surface, mark your cut line with a Sharpie (not a pencil—pencil marks can get lost in dust), and double check the length. If you’re using tin snips, go slow—cut along the edge, and snip small sections at a time to keep the cut straight. If you’re using a chop saw, clamp the tray down first so it doesn’t move, and wear a dust mask—metal shavings are no joke. Pro tip: if you’re cutting the end of the tray for a corner, mark the angle first (45 degrees for right angles, obviously) so it fits tight. Once you cut it, file the sharp edges down—those perforated holes can leave burrs, which can fray cable insulation. Don’t skip filing—my guy at the supply yard always says “burrs = broken cables later.”
Now, assembling the trays. Most perforated trays come in 10-foot sections, so you’ll need to splice them together if your run is longer. Use tray splice plates (the flat metal pieces that connect two ends of the tray) and splice screws—never just overlap the trays and tape them, that’s a fire hazard. How to do it: line the two cut ends of the tray up perfectly, so the holes on each side line up. Place the splice plate on the bottom of the tray (that’s where it won’t be visible, but it’s strong), then drive screws through the holes in the tray and the splice plate. Make sure the screws go all the way in, but don’t over-tighten them—you don’t want to warp the tray. For corners, use elbow trays (pre-cut 90 or 45 degree perforated elbows) instead of bending the tray yourself. Bending metal perforated trays will weaken them, and most areas won’t pass inspection if you do it. Trust me, I’ve had a contractor try to bend a tray, and the inspector made them remove it—worst 15 minutes of my day, helping him pull that back down.
Once the entire tray is up (all mounted and spliced), it’s time to run the cables. This is the fun part, but don’t just dump all the wires in at once. Arrange them neatly—power cables on one side, data cables on the other, if possible. That helps with electromagnetic interference (EMI), which can mess with data signals. Also, don’t overload the tray—most local codes say you can fill a perforated tray up to 40-50% of its internal height, so there’s room for ventilation and future cables. If you’re running heavy power cables, use cable ties that are rated for outdoor/industrial use, not the cheap plastic ones from the dollar store. And when you’re done, use a cover if it’s in a dusty or wet area—perforated covers snap on easily, and they keep debris out while still letting air circulate.
Wait, what about common mistakes I see every time? Let’s list those so you can avoid them. First, skipping pilot holes for mounting screws—leads to stripped screws or bent brackets. Second, wrong load rating—tray bends, cables get damaged. Third, using wood screws for concrete—they don’t hold, the tray falls. Fourth, not filing sharp edges—cable insulation gets cut, which is a huge safety risk. Fifth, overloading the tray—can cause sagging, which strains cable connections. Oh, and one more: not leaving extra length for future cables. It’s way easier to add a tray section than to run a whole new cable later, so plan for that.
Now, if you’re working on an outdoor install, there’s a few extra tips. Use galvanized steel perforated trays instead of regular steel—galvanized won’t rust, which is key for rain or snow. Also, make sure the tray is sloped slightly (1/4 inch per foot) so water runs through the holes instead of pooling. If it’s near corrosive materials, go with stainless steel trays—they’re a bit more expensive, but they last way longer.
At the end of the day, installing a perforated cable tray isn’t rocket science, but it does take a little prep and attention to detail. If you’re grabbing trays from a supplier, just give them all the details: your run length, cable type, load needs, and location. They’ll hook you up with the right stuff, and that saves you a ton of time and headache.
If you need more help picking the right tray, checking load ratings, or troubleshooting a tricky run, just reach out to us. We don’t do fancy sales pitches, just straight answers and quality cable trays that fit your project. No nonsense, just getting your job done right.
Lighting Fixtures References
National Electrical Code (NEC) Chapter 3: Cable Tray Systems
Manufacturer’s Installation Standards for Perforated Metal Cable Trays
Occupational Safety and Health Administration (OSHA) General Industry Standards for Electrical Wiring Methods
Underwriters Laboratories (UL) Standard 203: Cable Trays
Guangdong Yuelin Technology Co., Ltd.
As one of the most professional cable tray manufacturers and suppliers in China, we’re featured by quality products and low price. Please rest assured to wholesale durable cable tray in stock here and get quotation from our factory. Customized orders are welcome.
Address: No.8,Road3,Zone2,South China Pneumatic Hydraulic Hardware and Electrical City,Side of Xiedie Bridge,Guidan Avenue,Second Industrial Zone,Xiabei,Dali Town,Nanhai District,Foshan City
E-mail: 19820662886@139.com
WebSite: https://www.yuelinelectriccable.com/
