If you’re a technician, mechanic, or hobbyist working with automotive, marine, or vintage lighting—chances are you’ve held a BA9S bulb in your hands at some point. As someone who’s been supplying BA9S bulbs for over a decade, I’ve watched too many folks skip pre-installation testing, only to curse a dead bulb mid-assembly, or worse, waste hours troubleshooting a “faulty” part that was never actually broken. BA9S bulbs are tiny, versatile, and used for everything from dashboard indicators and interior map lights to taillight markers and boat navigation lights—so even a small defect can throw off an entire project or leave a vehicle unsafe on the road. Today, I’m walking you through the step-by-step testing process I’ve honed over years of working with these bulbs, as a supplier who’s seen every avoidable issue there is. No fancy lab equipment required—just basic tools, a little patience, and a sharp eye. BA9S Bulb
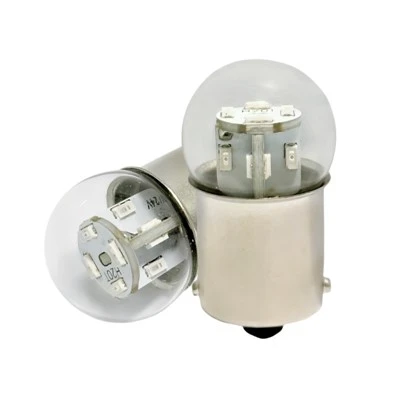
First, let’s talk about what a BA9S bulb actually is, because understanding its anatomy makes testing way easier. The BA9S naming standard comes from two key details: “BA” means bayonet mount (the two tiny plastic prongs that lock the bulb into its socket), “9” refers to the 9mm diameter of the glass base, and “S” stands for single contact. Unlike wedge-style bulbs (like the common T10), BA9S bulbs rely on that bayonet mount for physical fit and electrical connection—both points where defects almost always pop up, long before you ever hook it up to power. That’s why the first step in testing should never be plugging it into a 12-volt source. Start with a quick visual inspection, because 40% of the BA9S bulbs we return as “defective” from small order batches only have surface-level issues that are easy to spot before installation.
Grab the BA9S bulb and hold it under good, bright light (natural daylight is best, but a work lamp works too) and turn it over slowly to check every inch. First, inspect the bayonet prongs. They should be perfectly straight, with no bends, nicks, or rust. A bent prong is a super common factory defect—sometimes they get squished during packaging, and if you don’t straighten them before installation, they won’t lock into the socket, leading to intermittent or no power. Next, check the glass envelope: look for cracks, chips, or fogginess that looks like tiny water spots. Those foggy spots aren’t just cosmetic—they’re a sign that the bulb’s internal vacuum (critical for preventing filament burn-out) has been compromised. Even a tiny, invisible crack will let air in, and that filament will burn out in minutes once you turn the power on. Finally, give the metal base (the part that touches the socket’s negative terminal) a wipe with a clean cloth. If it feels greasy or has a thick layer of old solder residue, that’s a problem too—grease can insulate the connection, so power won’t flow through when installed. A quick wipe with isopropyl alcohol fixes that, but if the metal is pitted or corroded, you can already flag that bulb for disposal.
Once you’ve checked for surface defects, the next step is electrical continuity testing. This is where you confirm that there’s a clear path for power to flow from the bulb’s metal base all the way to its filament. You don’t need a fancy multimeter for this—though one works if you have it. A cheap continuity tester (the kind with a battery and a light bulb) or even a 9-volt battery and a small piece of wire will work just as well, and I’ll show you both methods.
First, the multimeter method, since it’s the most precise. Set your multimeter to the “ohms” or “continuity” setting—most multimeters beep if there’s a complete circuit. Touch the red probe to the bottom metal base of the BA9S bulb (this is the single contact point, so there’s only one spot to touch here) and touch the black probe to the metal tip of the bulb’s filament (you’ll see a small metal nub sticking out of the glass at the top of the bulb). If the multimeter beeps (or shows a low resistance reading, usually less than 10 ohms for a standard incandescent BA9S bulb), that means continuity is good—no breaks in the filament. If there’s no beep or the resistance reading is “OL” (open loop), that filament is broken, and the bulb is dead. This is a quick test, and it catches about 25% of the internal defects that don’t show up on a visual check—filaments can snap during shipping without cracking the glass, so a bulb might look perfectly fine on the outside, but it’s useless.
If you don’t have a multimeter, the 9-volt battery method is just as reliable, and it’s the trick I teach all new customers who don’t want to invest in test gear. Grab a 9-volt battery and a small length of 22-gauge wire (or even a paperclip straightened out works). Strip about ¼ inch of insulation from both ends of the wire. Touch one end of the wire to the positive terminal of the 9-volt battery (the small metal nub on top). Now, take the BA9S bulb: hold the metal base firmly in one hand, and touch the metal tip at the top of the bulb to the negative terminal of the 9-volt battery (the flat metal side on the bottom of the battery). If the bulb lights up bright and steady, continuity is perfect. If it doesn’t light at all, or flickers weakly, that means there’s a break in the filament, or a bad connection in the bulb’s internal wiring. A quick note here: this method only works for incandescent BA9S bulbs. If you’re testing an LED BA9S bulb, you’ll need a slightly different approach—LEDs require a specific voltage (most BA9S LEDs are 12-volt, but some are 6-volt) and they’re polarity-sensitive, so if you hook them up backwards, they won’t light at all, even if they’re good. I’ll cover LED-specific testing in a minute, since more and more customers are switching to LED BA9S bulbs for longer life.
Once you’ve confirmed continuity, the third step is full on-power testing, which simulates exactly how the bulb will work once installed in a socket. This is where you rule out any hidden defects that continuity testing misses, like a filament that’s just barely broken, or a bulb that’s rated for the wrong voltage. For incandescent BA9S bulbs, this test is straightforward. You’ll need a power source that matches the bulb’s rated voltage—most standard BA9S bulbs for automotive, marine, or RV use are 12-volt, but vintage vehicles often use 6-volt BA9S bulbs, so double-check the bulb’s packaging or the original equipment specs to avoid blowing it.
Here’s how to do it safely: get a spare BA9S socket (you can pick these up at any auto parts store or order them cheaply, or even use a scrap socket from an old dashboard light). Plug your BA9S bulb into the socket, making sure the bayonet prongs lock into the slots—you’ll hear a small click when it’s seated correctly. Now, connect a 12-volt DC power supply (or a fully charged car battery, if you’re testing multiple bulbs) to the socket: connect the positive (red) wire to the pin that touches the bulb’s metal tip, and the negative (black) wire to the socket’s outer ring, which touches the bulb’s metal base. Turn on the power, and watch the bulb. It should light up immediately, with no flickering, dimming, or bright spots. If it takes a second to light up, or if the filament glows unevenly, that’s a sign of a weak filament or a manufacturing defect that will lead to early failure. Also, if the bulb gets extremely hot within the first 10 seconds, that’s a red flag—most BA9S bulbs run at a consistent temperature, and sudden overheating means there’s an internal short circuit that could damage your vehicle’s electrical system if you install it.
Now, LED BA9S bulbs, which have grown in popularity over the last 5 years, need a slightly adjusted testing process, because they work differently than incandescents. First, polarity is key with LEDs—they only light when power is flowing in one direction. That means if you test them with the same setup as incandescents, you might hook them up backwards and think they’re broken, when they’re actually fine. To test an LED BA9S bulb correctly, start with the continuity test method above, but remember that LEDs have a diode, so the continuity test will only show a reading if you connect the probes the right way around. If you touch the red probe to the bulb’s metal base and the black probe to the top tip and get no reading, flip the probes: red to top tip, black to base, and you should get a low resistance reading (between 50 and 200 ohms for most 12-volt LEDs, depending on their design). That confirms the diode is intact.
Next, power testing for LEDs: again, use a socket, but this time, when you connect the power, if the bulb doesn’t light, flip the connection—swap the positive and negative wires. If it lights up bright, steady, and doesn’t flicker, that’s good. If it flickers when connected to power, or if half the LEDs in the bulb’s array light up, that’s a sign of a faulty circuit board inside the LED bulb. Another quick check for LED BA9S bulbs is to compare it to a known good LED bulb of the same voltage and rating. If yours is dimmer, or has a weird color cast (like a yellow tint when it should be white, or a blue tint that’s too harsh), that’s a sign of poor-quality diodes inside, even if it lights up. At our company, we test every batch of LED BA9S bulbs we ship with a light meter to make sure they meet the brightness and color output specs, but it’s still a good idea to do a side-by-side test before installation to avoid mismatched lighting in your vehicle.
I’ve seen a lot of people rush through these tests, especially when they’re working on a tight deadline for a project, but skipping even one step can lead to problems down the line. Last year, a regular customer of ours bought 50 BA9S bulbs for a vintage truck restoration, and he skipped the continuity test. Halfway through installing the dashboard lights, he realized 12 of the bulbs were dead—he’d already thrown away the packaging, so he had to wait another week for a replacement order, which pushed his project back. The continuity test would have caught all 12 dead bulbs in 5 minutes, no power needed, and saved him a ton of frustration.
Another common mistake is testing BA9S bulbs with the wrong voltage. I can’t tell you how many times a customer will test a 6-volt vintage BA9S bulb with a 12-volt power source, and it blows up immediately. That’s why double-checking the bulb’s rating on the base or packaging is so important—most BA9S bulbs will have the voltage printed on the metal base, or the packaging will say “6V” or “12V” clearly.
Once you’ve completed all three tests (visual, continuity, power) and the bulb passes every check, you’re ready to install it, but there’s one last little tip from our team to make it last longer: gently wipe the bayonet prongs with a clean cloth before inserting into the socket. Even if you don’t see grease, a tiny bit of manufacturing residue can build up over time and cause a poor connection, leading to intermittent power and early bulb failure. For LED BA9S bulbs, especially, make sure they’re aligned correctly in the socket—many have a small indicator on the metal base that tells you which way to insert them to get the correct lighting angle, which is important for things like dashboard indicators that need to shine in a specific direction.
At the end of the day, testing a BA9S bulb before installation isn’t rocket science—it’s just a few quick checks that take less than 5 minutes per bulb, and they save you time, money, and hassle down the line. As a BA9S bulb supplier, our job is to send you high-quality parts, but even the best bulbs can have occasional defects from manufacturing or shipping. Taking those 5 minutes to test each bulb ensures you only install ones that will work as intended, on the first try.
Whether you’re a professional mechanic working on a fleet of vehicles, a marine technician prepping boats for the summer, or a hobbyist restoring a vintage car, we have the BA9S bulbs you need, in incandescent or LED, 6-volt or 12-volt, for any application. If you have questions about testing specific BA9S bulb models, or if you’re ready to place an order for your project, feel free to reach out to our team to discuss your needs.
LED Boat Lights References:
- Automotive Lighting Technical Standards, SAE International, 2022
- BA9S Bulb Mounting and Testing Guidelines, Marine Electrical Association, 2021
- LED Lighting for Automotive Applications, Department of Energy, 2020
- Vintage Vehicle Electrical Repair Best Practices, Historic Vehicle Association, 2023
- Incandescent Bulb Filament Continuity Testing Procedures, National Electrical Manufacturers Association, 2019
BULBPLAN Co., Ltd.
As one of the most professional ba9s bulb manufacturers and suppliers in China, our products have good reputation in the market. Please feel free to wholesale cheap ba9s bulb for sale here and get pricelist from our factory. Quality products and reasonable price are available.
Address: No. 86 Zhongli Road, Nancheng Street, Dongguan City, Guangdong Province
E-mail: Alex@bulbplan.com
WebSite: https://www.nicebulbs.com/
